|
Cloware integration with Tally.ERP 9
|

|
|
Cloware Order Management Service (OMS) is primarily targeted towards
the Forward Supply Chain process of businesses selling Packaged Goods. We refer to this
as "Sales Enablement", which covers a vast ecosystem of Manufacturers, C&F, Distributors,
Traders, Stockists and Retailers.
Cloware OMS is a Cloud based mobile service for various users in this ecosystem.
Like all systems, for Cloware to succeed, it needs to be integrated with the core
systems used by each of the user. For example, Manufacturer's ERP, Distributor's
Billing system, Retailer's POS etc.
As per estimates, there are over 8 million businesses that urgently need to leverage
Information & Communication Technology (ICT) to grow or continue to stay in business.
With over 62% of first time buyers of Personal Computers going in for Finance and Accounting,
and with Tally.ERP 9 commanding 92% market share, is imperative that we integrate
Cloware OMS with Tally.ERP 9.
|
Overview
The overall Forward supply chain process is described below and the various Cloware
related applications are highlighted in yellow.
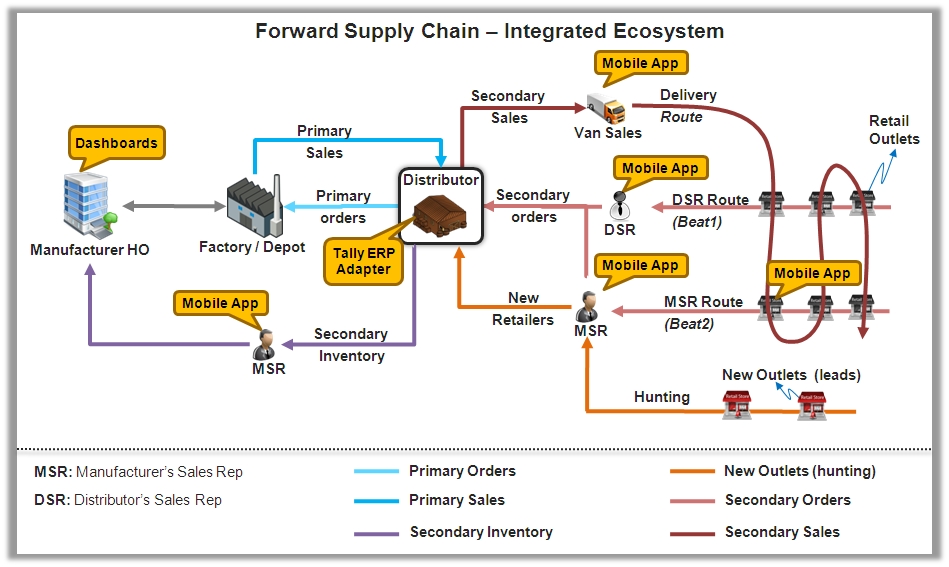
The Distributor is a central user in the Forward supply chain and primarily uses ONLY
one system - Tally.ERP 9. Hence the "Tally.ERP 9 Adapter" is a key component that connects this
Tally.ERP 9 of distributor with various application components, like
- MSR mobile app that captures Orders, stock positions at retailers, new lead capture etc.
- DSR's mobile app that captures Orders, stock positions at retailers etc.
- Van Sales Reps mobile app that enables Sales invoices, Collection etc.
- Uploading Secondary Sales (Invoices) of Distributor to HO for channel sales visibility.
The next sections talk about how to install and configure this adapter to achieve this.
|
Technology Architecture
This section explains the implementation of the Cloware Tally Adapter for integrating with the
Cloware system with a Tally.ERP 9 instance (version 3.2 or higher).
Briefly, the Cloware system is a Cloud hosted service provided by GoDB Tech that enables last
mile sales and distribution processes via Mobile phones (J2ME, Android etc). For more details
about Cloware, please visit www.cloware.com.
Below is a high level architecture showing the way the Cloware and Tally.ERP 9 systems are integrated.
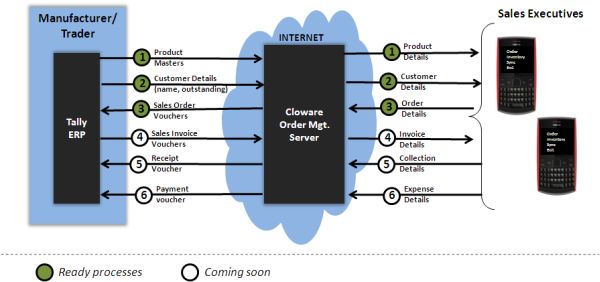
The above diagram shows the various parts of this integration:
- Manage product masters (Item list, price etc) in Tally.ERP 9 and view the updates in the Mobile phones of Sales executives on the field
- Maintain customer masters (name, outstanding etc) in Tally.ERP 9 and view the updates in the mobile phones.
- Sales executives capture orders in the mobile phones and the same are reflected in Tally.ERP 9 as sale order vouchers.
- Additional features coming soon are:
- Sales invoices are generated in Tally.ERP 9, and the same can be viewed in the mobile phone, so that the sales executives can have a better discussion with the customer on the status of their orders.
- Sales executives collect payments from a customer and the same are reflected as Receipt vouchers in Tally.
- Sales executives track their expenses via the mobile phones and the same are uploaded to Tally as payment vouchers.
|
Part 1: Download the Setup Files
| Step 1 |
Download the setup files.
|
| Step 2 |
Extract the ZIP file to your local folder (say "c:\cloware")
|
| Step 3 |
You would the below folder structure
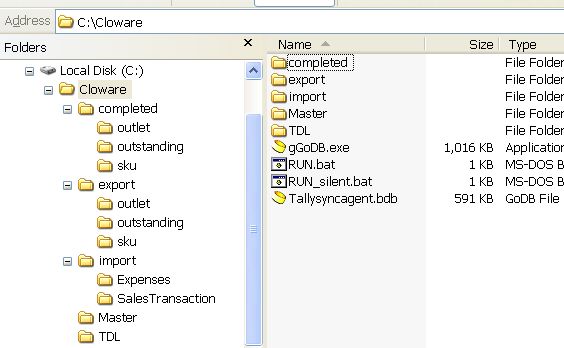
The above diagram shows the various parts of this integration:
- Completed - This folder contains all the files that were successfully uploaded to Cloware server.
- Export - This folder contains all the files exported from Tally.ERP 9 to the adapter's folder.
- Import - This folder contains all the files downloaded from Cloware server and to be imported into Tally.ERP 9.
- Master - This folder contains the sample data for master information to be imported into Tally.
- TDL - This folder contains the custom TDL scripts to be applied to the specific Tally.ERP 9 instance.
- Adapter files - These files (gGoDB.exe, Tallysyncagent.bdb, RUN.bat, RUN_silent.bat) are part of the adapter interface that can be configured and made to run at scheduled intervals to upload/download data from Cloware server.
|
|
Part 2: Installation Steps in Tally.ERP 9
| Step 1 |
Connect the below two TDL files with your Tally.ERP 9 instance / company.
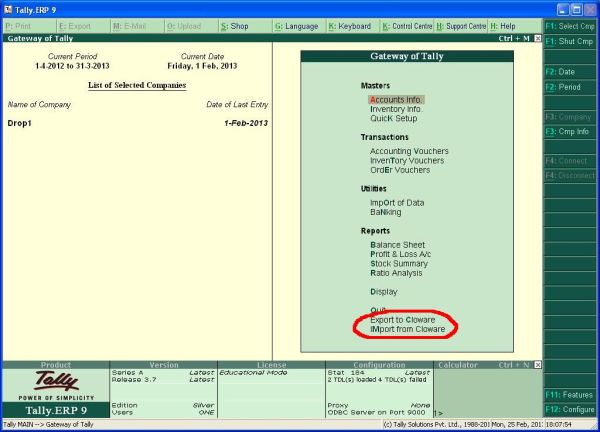
The Tally menu should look like this now:
|
| Step 2 |
Configure Tally to point to the Cloware Adapter folder (i.e. c:\cloware") as showing below:
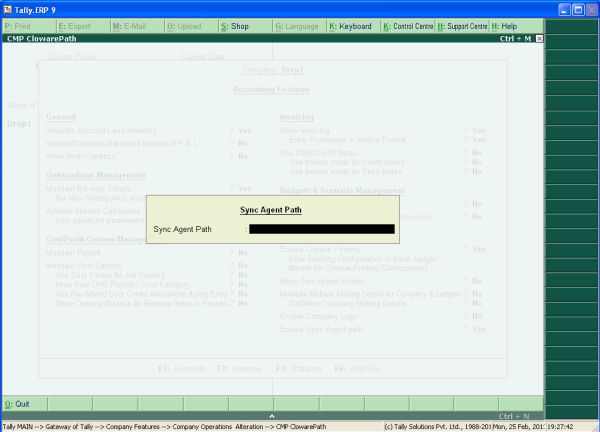
The "Sync Agent Path" is the folder where the Cloware adapter is present,
and should contain three sub folders called - "sku", "outlet", "outstanding".
|
| Step 3 |
The adapter kit comes with a sample file called "clowaremaster.xml" which
contains master data for few SKUs and customers (sundry debtors).
This can be imported quickly into a new Tally instance to see the functioning of the system.
For this, in Tally go to "Import of Data" → "Master" → "clowaremaster.xml"
|
| Step 4 |
Go to Tally's main menu and click on the menu item "Export to Cloware"
This will export the following
- List of Customer / Outlets
- List of SKUs and
- Outstanding detail for each customer
|
|
Part 3: Installation Steps for Cloware Adapter
| Step 1 |
Open the Cloware Adapter folder (example as per the Part1-Step2: "c:\cloware\")
There would be four files- gGoDB.exe, Tallysyncagent.bdb, RUN.bat and RUN_silent.bat
|
| Step 2 |
Execute (double click) on "RUN.bat"
|
| Step 3 |
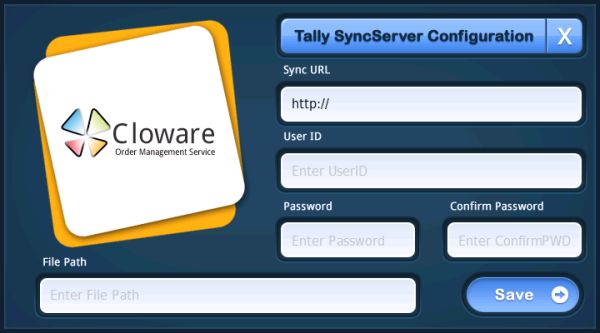
The Tally Adapter configuration screen would be started, which should look like below:
|
| Step 4 |
In Sync URL enter the path http://drop1.cloware.com
|
| Step 5 |
Regarding the User ID and Password, please contact the Cloware team, for a demo credentials.
|
| Step 6 |
In File Path enter the path to the "export" folder pointing to the files exported
from Tally (say "c:\cloware\export")
|
| Step 7 |
Click on the Save button.
|
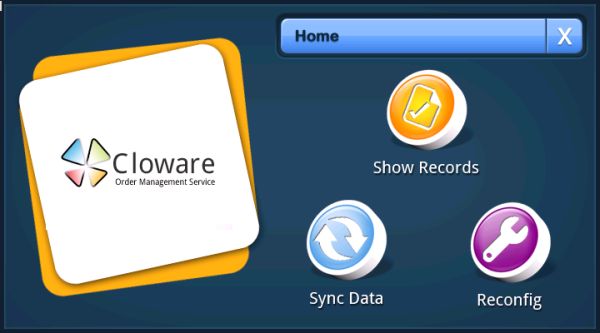
| Step 8 |
Once the configuration is saved, you should see a screen like below:
|
|
Part 4: How to Manually Operate
Now that the Tally.ERP 9 and the Cloware Adpater are setup, we can look at the steps to
operate the system, so that the Masters are exported (from Tally → Cloware → Mobile)
and Transactions are imported (from Mobile → Cloware → Tally).
| Step 1 |
Open Tally.ERP 9 and click on the menu "Export to Cloware"
(if there are any changes made to the SKU / customer list / outstanding information.
|
| Step 2 |
Open the Cloware adapter (refer Part3-Step8).
Click the Sync Button (to manually synchronize the Cloware adapter with the Cloware server.
|
| Step 3 |
All CSV files (SKU, outlets, outstanding) placed in the "export" folder
(i.e. "c:\cloware\export") would be exported to Cloware server. Once uploaded these
files would be automatically moved to the completed folder (i.e. "c:\cloware\completed")
|
| Step 4 |
All incremental data from Cloware system (expenses, sales orders) would be downloaded in
Tally XML format and placed in the "import" folder (say: "c:\cloware\import").
|
| Step 5 |
Open Tally.ERP 9 (if not already opened) and click on the menu "Import from Cloware", to
import the new sales orders generated in the Cloware system.
|
|
Part 5: How To Automate The Adapter
Simple ! Launch "Run_silent.bat" (instead of "RUN.bat")
Once the manual process works fine, you do NOT need to click on the Sync button in the Cloware
adapter each time to upload/download from Cloware server. Instead an alternative batch file
called "RUN_silent.bat" is available in the adapter folder (i.e. "c:\cloware\"), which
would make the Cloware adapter run at a scheduled interval.
|
Interested?
Please contact us at
sales@godbtech.com
and we would be glad to help you implement this.
|
